Contents
Introduction
One of the more common problems / use cases encountered by SEOs these days is bringing together all their various data sources (GA, GSC, Rankings, Logs, Link Metrics etc) to either be useful, or to even begin to paint a picture that will be somewhat useful for querying and analysis. And for many within the industry, this problem has caused many to coalesce around the use of BigQuery to bring all these disparate data sources together; both for reasons of cost, scalability and flexibility.
So with this particular, use case in mind we’ll begin to look at how we can start making inroads into bringing all these data points together by talking about how we can make a basic request to an API, and turn this into a daily scheduled Cloud Dataflow job to then store this information in BigQuery.
For this tutorial, I’ll be utilising the Apache Beam framework to build the data pipeline, in addition to using Google Cloud Dataflow as my “runner” to execute the pipeline job, before storing it in the database.
Why Apache Beam?
So first of all, why use Apache Beam? Well, I’d first been introduced to this fascinating technology way back in the summer of 2017 when JR Oakes posted about loading STAT ranking data into BigQuery. But it was only until this year, with the oceans of additional free time that lockdown provides that I’d really had time to dig into how it works, and exploring how to adapt it to my own data needs.
But what is Apache Beam? Well, taken from the website…
“Apache Beam is an open source, unified model for defining both batch and streaming data-parallel processing pipelines.”
So to unpack this quote a bit, Beam is a “unified model”, i.e. a framework that can be adapted to multiple SDK’s, and applies to both batch and streaming jobs (unlike various other tools that will only do one or the other) and it processes this data in parallel - meaning that it is both fast, and memory efficient.
Essentially, Beam is a framework for data extraction, transformation & storage (ETL).
The stated goal for the Apache Beam developers is for you to be able write your pipeline in whatever language you want (Java, Python, Go, SQL, Scala) and then run that pipeline code, on whatever platform you want (Flink, Spark, Apex, Dataflow).
For an extremely good / thorough in-depth introduction to how Beam works, check out this excellent video.
The name Apache Beam itself is a portmanteau of both “batch” & “stream”, which is a neat little metaphor for how it circumvents the need to create separate pipelines for either a continuous stream job, or a one off bulk upload batch pipeline (as with Apache Spark). Instead, it provides you with a flexible tool to transform and adapt a single pipeline to either use case, with minimal effort.
In fact, if you were to switch from batch to a streaming pipeline, the only things you’d really need to change, would be to add p.wait_until_finish() at the end (telling it to run forever until it’s explicitly told to stop) and setting: options.view_as(StandardOptions).streaming = True in your pipeline options, and that’s it!
So the benefits of Beam are manifest, with it’s general purpose flexibility, and simplicity residing at its heart.
Building Blocks of Beam
Broken down into its constituent parts, the Beam API consists of the following elements:
- Pipeline - your pipeline object, which makes up your directed acyclic graph (DAG) of data transforms and functions, and encompasses your entire Beam pipeline from beginning to end.
- PCollections - comprises your data (which is immutable), that can come from a bounded (i.e. fixed - think batch uploads) or unbounded (unlimited stream).
-
PTransforms - make up your core functions, or transforms, that you’ll carry out on your data, such as to format, reduce, group, or aggregate your raw data. The PTransforms consists of:
- ParDo - literally, a parallel do function, similar to .map(), carries out elementwise changes to your data.
- Combine / GroupByKey - as you’d expect groups your data items together by some key and aggregates, combines or reduces them depending.
- I/O Transforms - and then there’s your regular Input/Output transforms, for reading data from a range of sources, namely: CSV, Cloud Storage, BigQuery etc.
The “P” in all of these stands for “Parallel” of course, which is in reference to the way that Beam carries out its processing. Namely how during the execution stage, each of the core components of the pipeline can themselves be decomposed into many smaller bundles of data, that can then be processed independently and in parallel.
This is particularly important when we get to running the pipeline jobs, where we choose our Runner, as we can then scale up or down the number of “workers” that we’ll use to execute this pipeline, and thus can greatly scale up or down the speed at which or job can be run.
So now that we’ve gotten the preamble out the way, let’s get into the more interesting topic of how we can go about setting up our pipeline!
Building the Pipeline
Install required packages:
- Install the Google Cloud SDK
If you’re on a Windows machine like me (you poor soul) you can simply download the executable file from there, and wait for it to finish. Otherwise if you’re on Mac you can simply make a curl request in bash with the following command:
curl https://sdk.cloud.google.com | bashNext you’ll need to install the Apache Beam package:
pip install apache-beam[gcp]And then you’re pretty much ready to get started, you just need to ensure you’ve got the right permissions in your project set up by creating a service account (guide on how to do that here if you haven’t already).
And then setting your GCP Credentials:
set GOOGLE_APPLICATION_CREDENTIALS=service-account.jsonPipeline Basics
Next, we’ll look at building the main Beam pipeline itself. The nuts and bolts of the pipeline consists of 4 things:
- Schema
- GetAPI()
- Arguments
- Pipeline
1) Schema
The schema is basically what you’d expect, just an array of dictionaries for BigQuery to understand what value / format each column is going to be, and whether it’s either a required or nullable field, whether it’s a string, integer, or float.
2) GetAPI()
Next, is the main class where we’ll use to call our API. The get_job() method builds the request URL, passing in the required parameters, and then makes a request to the endpoint. The response is returned and then we filter out some peculiarities to the Rank Ranger API (where it contains either hyphens, or empty objects). There’s a small amount of error handling going on here, should we not get a 200 response on the first attempt, but nothing too fancy.
class GetAPI():
  def __init__(self, data={}):
    self.num_api_errors = Metrics.counter(self.__class__, 'num_api_errors')
    self.data = data

  def get_job(self):
    import requests
    params = dict(
        key = self.data.api_key,
        date = self.data.date,
        campaign_id = self.data.campaign,
        se_id = self.data.se,
        domain = self.data.domain,
        output = 'json'
    )
    endpoint = "https://www.rankranger.com/api/v2/?rank_stats"
    logging.info("Endpoint: {}".format(str(endpoint)))
    try:
        for i in range(0, 3):
            res = requests.get(endpoint, params)
            if res.status_code == 200:
                break
            time.sleep(3)
        json_data = res.json()
        if 'result' in json_data:
            response = json_data.get('result')
            filtered_res = [{k: v for k, v in d.items() if v != '-' and len(v) != 0} for d in response]
            return filtered_res

    except Exception as e:
        self.num_api_errors.inc()
        logging.error('Exception: {}'.format(e))
        logging.error('Extract error on "%s"', 'Rank API')
3) Runtime Parameters
Next, is where we’ll pass in the arguments for our GetAPI class to use at runtime. These include things that will likely end up as environment variables in our Cloud Function that we’d rather not make public: things like your API Key, Campaign ID, Domain name and so on.
Anyone who’s used command line scripts in the past will be more than familiar with these work, and will live inside of our run() function (not to be confused with p.run() which executes the pipeline), and will basically follow the format of:
def run(argv=None):
    parser = argparse.ArgumentParser()
    parser.add_argument('--api_key',
        type=str,
        help='API key for Rank API.')
    parser.add_argument('--date',
        type=str,
        help='Run date in YYYY-MM-DD format.')
    # ...multiplied for all the required arguments
Note: we use a fair few flags in our Beam script, and this is largely due to the API requiring a number of them (in addition to our BigQuery ones). In contrast to the majority of pipelines you may encounter, that will likely only have a couple for say, the input filename, and an output BigQuery table.
4) The Pipeline
Lastly, is where we’ll run the actual Pipeline itself. Here, we’ll build the pipeline object by passing our PipelineOptions to the beam.Pipeline constructor. And then we’ll outline which operations to run, using the slightly unusual syntax of using the pipe | operator, which functions as more of a logical AND function, to allow you to append subsequent steps of the pipeline.
p = beam.Pipeline(options=options)

api = (
    p
    | 'create' >> beam.Create(GetAPI(data=args).get_job())
    | 'format dates' >> beam.Map(format_dates)
)

BQ = (api | "WriteToBigQuery" >> beam.io.WriteToBigQuery(
                                            table=args.table_name,
                                            dataset=args.dataset,
                                            project=args.project,
                                            schema=SCHEMA,
                                            create_disposition=beam.io.BigQueryDisposition.CREATE_IF_NEEDED,
                                            write_disposition=beam.io.BigQueryDisposition.WRITE_APPEND))

p.run()
In our pipeline, we wrap the GetAPI class in the Create transform (to create a Pcollection from in memory data), and then pass in our runtime args variable, and call the get_job() method to make a request to the endpoint.
Then we use beam.Map() as an element-wise operation to format all the dates in the date column (much in the same way that we’d use the .apply() function in pandas) to reformat the APIs American dates (eww).
Lastly, and most straightforward of all, we write the data (or PCollection) that we have to BigQuery, passing it the table_name, dataset, GCP project, and schema arguments that we declared earlier, as well as some additional I/O specific arguments on what we wish to do should a table not already exist, and if we want to append or insert it to the end of the table.
Building the Flex Template
Now that the python code is written, we can start thinking about how we can template our pipeline into a re-usable format. To do this we’ll be using Google’s Flex Templates. Which are fantastic for building multi-purpose pipelines, but the primary reason is that unlike regular templates, they allow you to declare dynamic variables at runtime.
Create Docker Image:
So we’ll start by building our container image. We’ll be using gcloud builds to do this, and the cool thing about it is that you can build a Docker image, without actually needing to install Docker itself. Obviously you can if you want just by running docker build on your local machine instead (for more on that, you can read more here), but for the purposes of this post, we’ll simply be using the gcloud command.
This will use your local Dockerfile in your project folder to build the container image out of your main.py & install any packages via the requirements.txt.
FROM gcr.io/dataflow-templates-base/python3-template-launcher-base

ARG WORKDIR=/dataflow/template
RUN mkdir -p ${WORKDIR}
WORKDIR ${WORKDIR}

COPY requirements.txt .
COPY main.py .

ENV FLEX_TEMPLATE_PYTHON_REQUIREMENTS_FILE="${WORKDIR}/requirements.txt"
ENV FLEX_TEMPLATE_PYTHON_PY_FILE="${WORKDIR}/main.py"

RUN pip install -r requirements.txt
And then we can just build the image with the following gcloud command:
gcloud builds submit --tag eu.gcr.io/$PROJECT/beam-image:beam-test .Note: Building the container registry in your own region (avoid Cloud Storage multi-region costs) following the guidance provided on the container registry site you need to prepend the relevant region code prior to gcr.io e.g. for EU it would be eu.gcr.io or for Asia it would be asia.gcr.io.
Regardless, ensure it matches the region you’re keeping all your other Google Cloud Storage files to avoid incurring any additional costs.
This may take a couple mins, and you should start to see some an endless wall of messages along the lines of: “Verifying checksum”, “Download Complete”, “Pull complete” and at the end you’ll get a table showing you your template’s Image Name, ID, Creation time as well as a “SUCCESS” message once it’s done.
You’ll also get a couple files show up in Cloud Storage called something like the name of your project_cloudbuild if you’ve used the cloudbuild.yaml file to build your image, or plain old artifacts.project.appspot.com if you used the method described above.
Set up your Cloud Storage Bucket
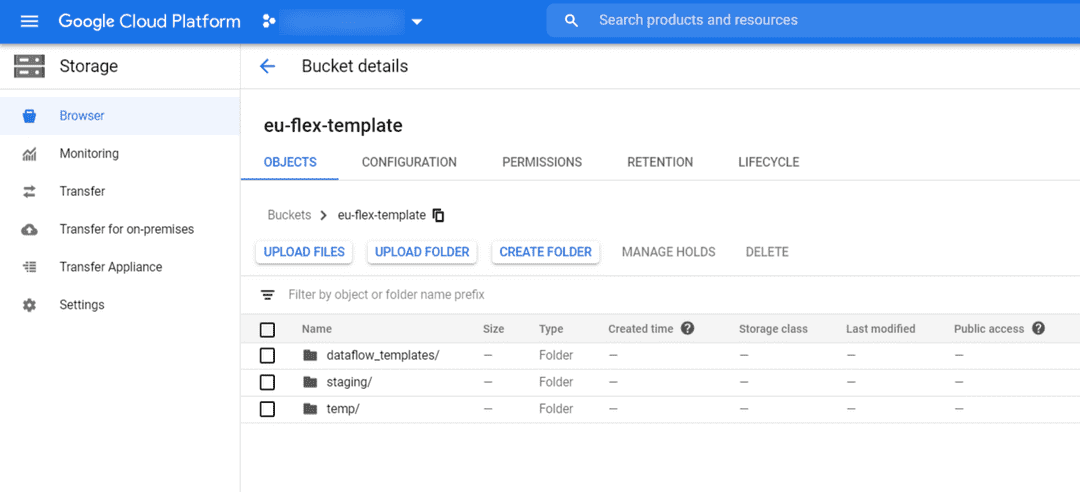
One quick thing you’ll need to do before creating your template is to set up your Cloud Storage bucket with a couple empty folders you’ll need, for when you actually run your template pipeline.
This consists of your Bucket itself, but inside of that, you’ll need to create two folders named staging and temp. Note that if you skip down to running the flex template, you’ll see we need to specify the staging_location and temp_location at runtime, and this is basically what those are referring to, as this is where those files will be stored when it comes to executing the template in the wild.
Run Flex Template Build Command:
Then, we’ll actually build our Flex Template from our container image, using the following:
gcloud beta dataflow flex-template build gs://$BUCKET/dataflow_templates/rank_stream_to_bigquery.json \
    --image=eu.gcr.io/$PROJECT/beam-image:beam-test \
    --sdk-language=PYTHON \
    --metadata-file=metadata.json
It should then say that “successfully saved container spec in flex template file” and print out said template container spec to the command line (this is essentially printing out a copy of your metadata.json along with the image name and your SDK language of choice.
Now if you check your Cloud Storage bucket, you show now see a folder named “dataflow_template” and inside of that will be the .json file containing your brand new Flex Template!
Testing the Flex Template Locally:
You can then test that your template works by using the runner=DirectRunner argument to run it locally, or runner=DataflowRunner to have it executed on cloud Dataflow. To do this, we’ll use the following:
gcloud beta dataflow flex-template run rank-stream-to-bigquery-`date +%Y-%m-%d` \
    --template-file-gcs-location=gs://$BUCKET/dataflow_templates/rank_stream_to_bigquery.json \
    --parameters api_key=$API_KEY \
    --parameters date=$DATE \
    --parameters campaign=$CAMPAIGN_ID \
    --parameters se=$SE_ID \
    --parameters domain=$DOMAIN \
    --parameters project=$PROJECT \
    --parameters dataset=$DATASET \
    --parameters table_name=$TABLE \
    --parameters bucket=$BUCKET \
    --parameters runner=DataflowRunner \
    --parameters experiments=disable_flex_template_entrypoint_overrride \
    --parameters staging_location=gs://$BUCKET/staging \
    --parameters temp_location=gs://$BUCKET/temp \
    --parameters service_account_email=$SERVICE_ACCOUNT \
    --region=$REGION \
    --project=$PROJECT
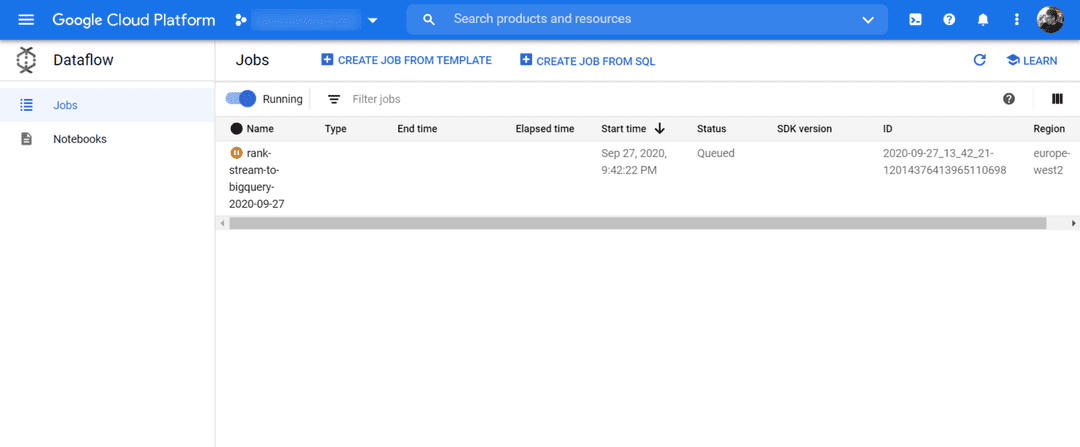
You should then receive a happy little message fairly soon after, giving you the info on your Dataflow job that you’ve just initiated, and if you hop on over to Dataflow in Google Cloud Platform, you’ll see a job, waiting to be executed.
It’ll probably be queued (assuming you haven’t paid de niro for a bunch of workers) until Dataflow assigns it enough resources to run the template.
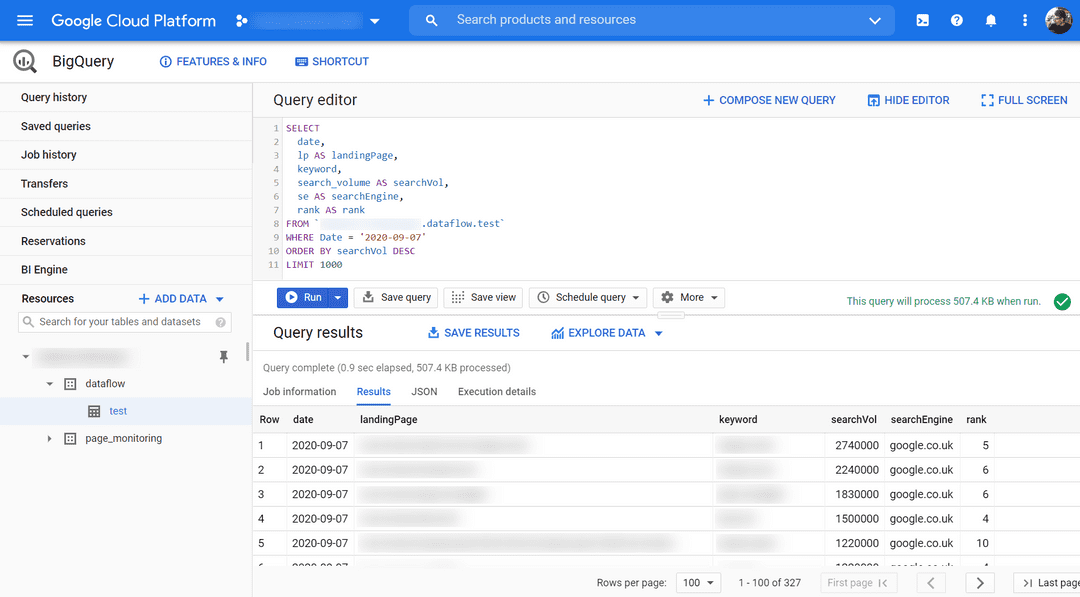
Check BigQuery
So once that’s done - and assuming all’s gone well - in a few short minutes, your should be seeing some delicious data showing up in your preferred cloud database of choice:
Scheduling the Pipeline
So with our template successfully running, and data correctly populating our BigQuery table, the final step we need is to schedule a Cloud Function to run the Flext Template job each morning using Google Pub/Sub messages and the Cloud Scheduler service.
Create a Cloud Scheduler Job
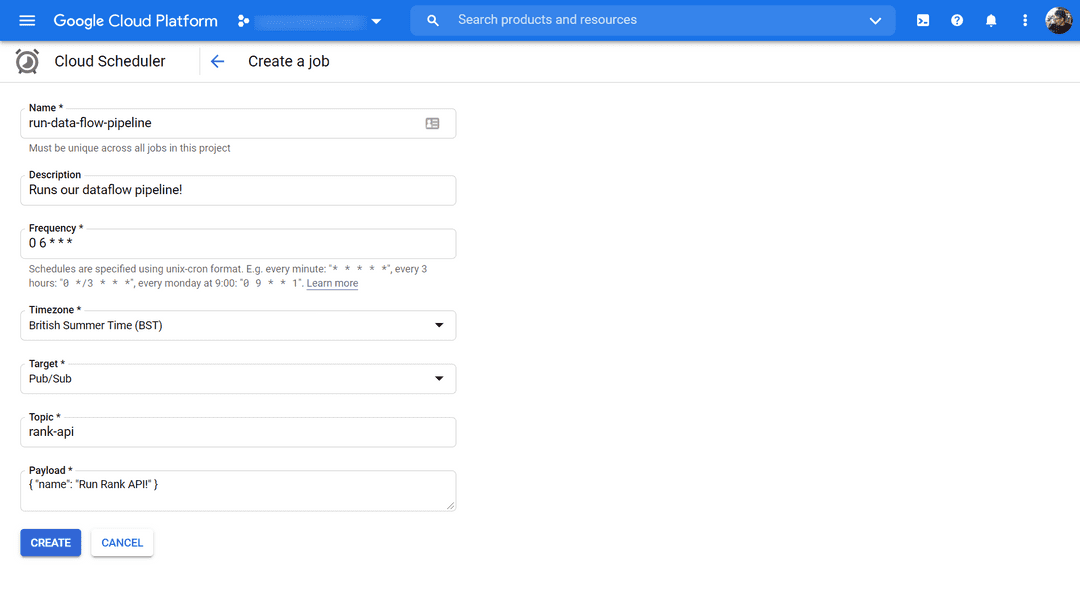
So the first thing we need to do in the second part of getting this bad boy up and running, is to create a Cloud Scheduler job that will run at the designated time, and kick off our entire pipeline.
For this head to Cloud Scheduler in GCP and hit “Create Job”. Then we’ll enter in all the necessary fields such as: name (must be unique across all jobs), a quick description, and the frequency at which to run the job.
For this we’ll be using the unix Cron syntax (check out cron.help for a nifty aid) and we’ll just set ours to run every day at 6am with 0 6 * * *.
Then we’ll enter the PubSub topic we’re going to use it to send a message to (again name can be whatever you like) and then define a message to send (again can be anything) we won’t actually be using the contents of the message, we’ll just be using it to send a message event for our Cloud Function to listen for and launch the Flex Template later down the line.
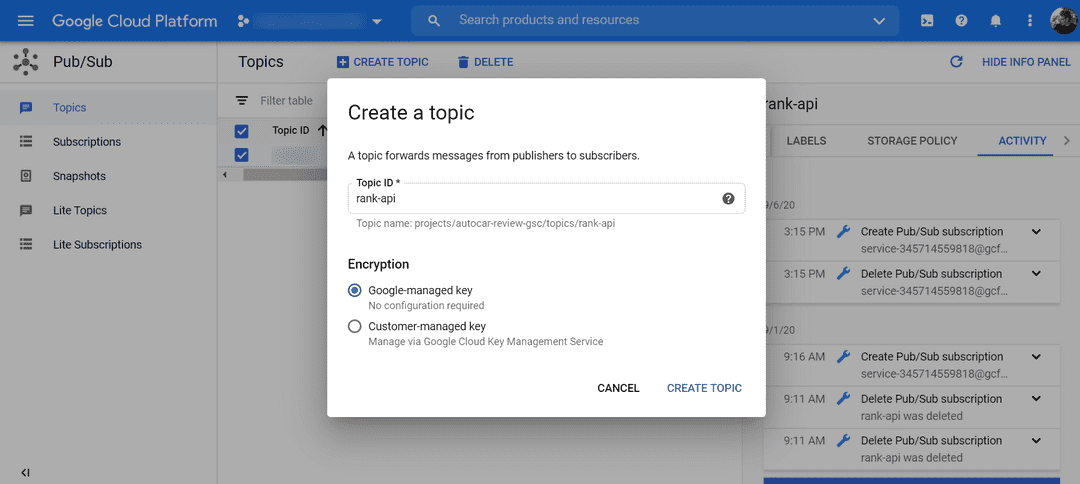
Create the Pub/Sub Topic
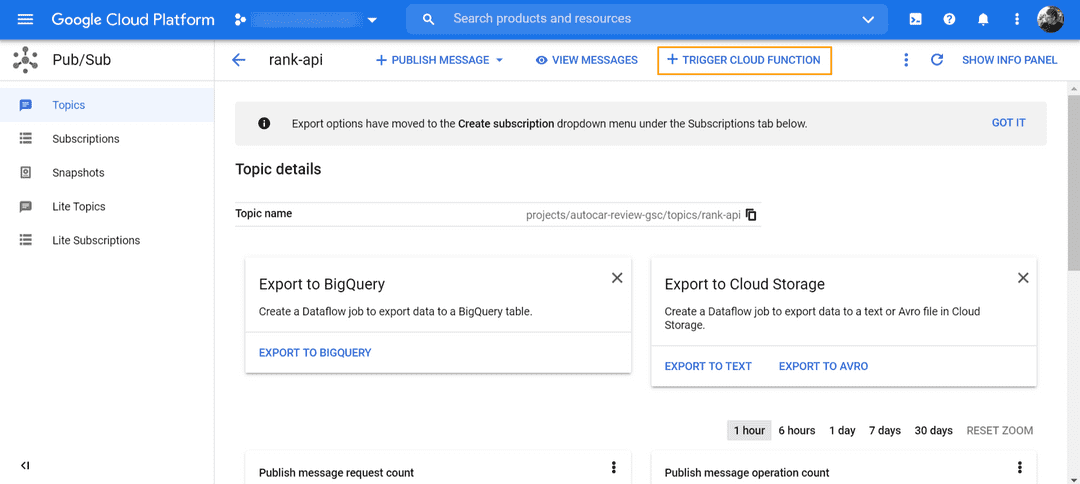
Next, we’ll create the PubSub topic, which we’ll use to send messages from the Cloud Scheduler job to the Cloud Function, to run our template.
Then, once we’ve created a topic, we’ll be presented with the option to use it to trigger a Cloud Function when it runs.
Google Cloud Function
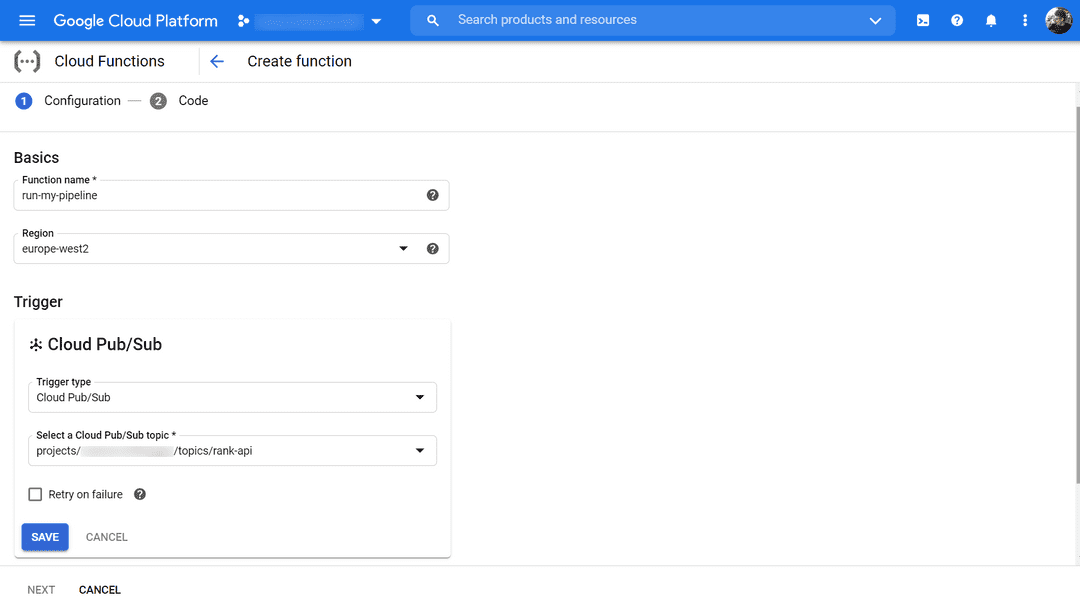
After we’ve opted for this method, we should now find ourselves inside the Cloud Function interface itself, end nearing the end of our journey. For this we need to change our trigger type to Cloud Pub/Sub, select the Topic that we just created, and remember to hit “Retry on failure” (just in case we run into any issues).
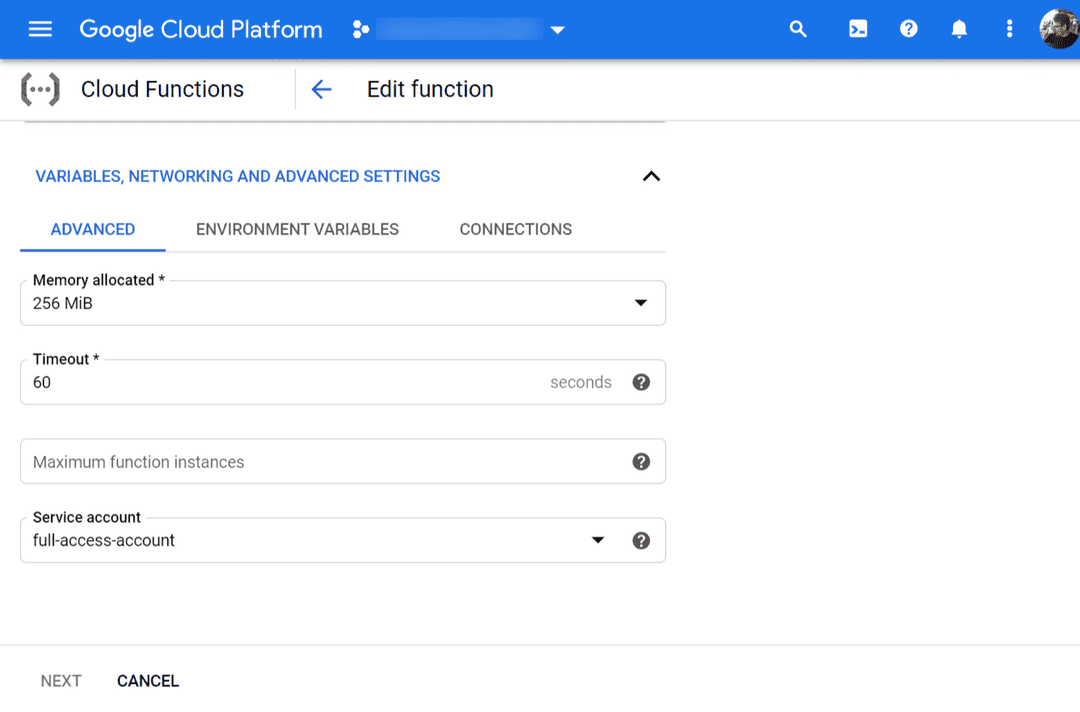
Next, select ”Variables, Networking and Advanced Settings”. Firstly we’ll need to define the specs of the Compute Engine instance we’ll be running to execute the Cloud Function. For this I’ve just gone with the default 256MB of RAM - which should be more than enough, as well as a timeout of 60 seconds - (again way more than we’ll likely ever need).
If you ran the Beam pipeline locally in your terminal beforehand, you’ll know that this thing basically takes a half a second to run before it’s shipped off to Dataflow - so there shouldn’t be any need to worry about going over this limit.
And finally, like we did locally, we just need to define our GCP Service Account - to ensure you’re using an account which has all your APIs switched on, so that nothing minor is tripping you up during the execution of your code.
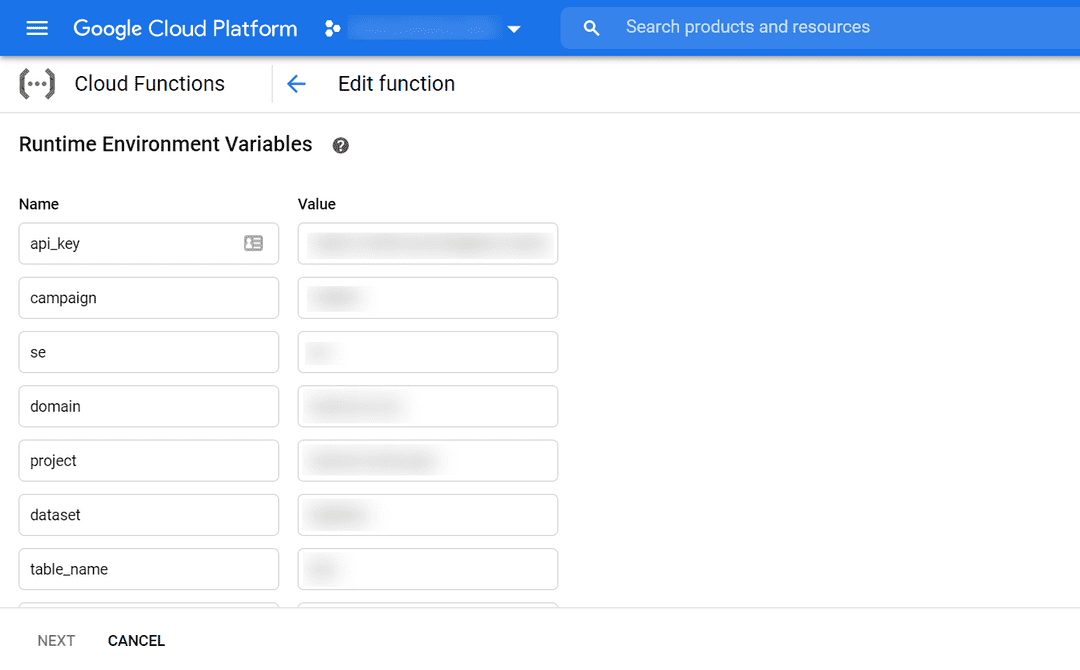
Next, we’ll configure the variables that we’ll pass into our Cloud Function / Beam Pipeline at runtime. This will include all the things we need to get a successful response from the API, such as the key, campaign ID, domain, as well as the BigQuery vars we’ll need such as the Project name, BigQuery dataset and table.
Note: for the “date” argument, we pass this in by generating locally within the GCF itself.
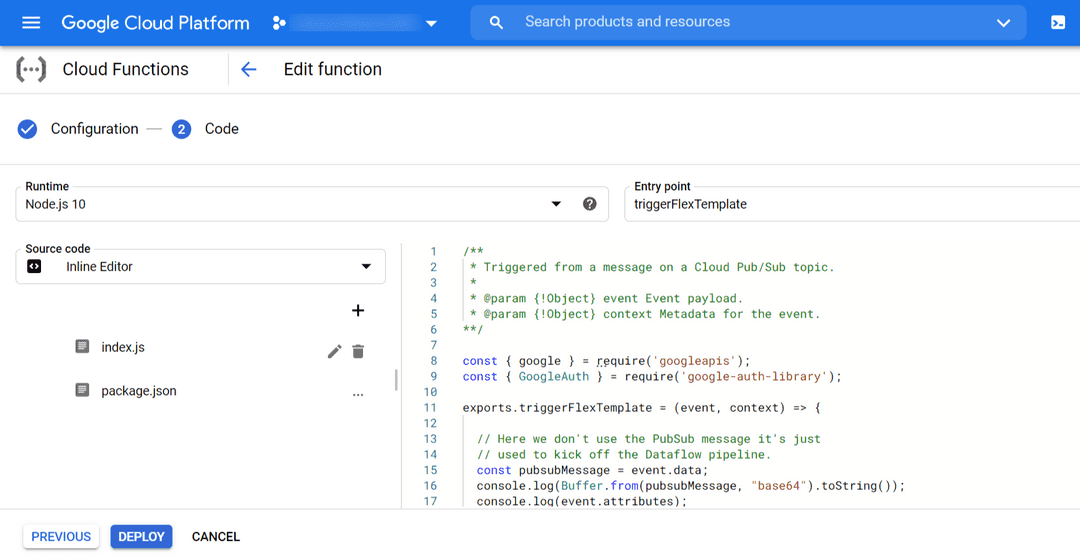
Once that’s done hit “Next”, and we’ll be greeted with the Cloud Function Code Editor. It’s a bit basic, but we don’t really need it for much, other than to add our code to the index.js file (I’ll be using the Node v10 runtime environment to execute this) as well as a package.json so that GCF knows what packages it needs to install each time it gets deployed for it to run successfully in production.
The package.json should look something like this:
{
  "name": "pubsub-flex-template-trigger",
  "version": "1.0.0",
  "dependencies": {
    "google-auth-library": "^6.0.6",
    "googleapis": "^59.0.0",
    "@google-cloud/pubsub": "^2.5.0"
  }
}
While our Cloud Function, should look something like the below. In summary, the basic structure of the function is as follows:
- Pub/Sub event message - We take in and log out the message & event data to make sure we’ve received it.
- Authentication - Next, we define our
GoogleAuthconstructor, and pass in the scopes we need to run this sucker. - Dataflow - Then, we’ll build our dataflow object, using the Google APIs module, and using the dataflow method, to build the REST API request URL, passing in the authentication credentials we just used.
- Launch - Next is building the lengthy
.launch()method on the Dataflow Flex Template object. - Arguments - And lastly, we simply pass in the environment variables that we declared earlier in our Cloud Function to populate each parameter of the pipeline - as well as using some basic JavaScript to grab today’s date.
This should give us something that looks like this:
// trigger.js
const { google } = require('googleapis');
const { GoogleAuth } = require('google-auth-library');

exports.triggerFlexTemplate = (event, context) => {

  // Here we don't use the PubSub message it's just
  // used to kick off the Dataflow pipeline.
  const pubsubMessage = event.data;
  console.log(Buffer.from(pubsubMessage, "base64").toString());
  console.log(event.attributes);
  console.log(context);

  const auth = new GoogleAuth({
    scopes:["https://www.googleapis.com/auth/cloud-platform",
            "https://www.googleapis.com/auth/compute",
            "https://www.googleapis.com/auth/compute.readonly",
            "https://www.googleapis.com/auth/userinfo.email"]
  });

  const dataflow = google.dataflow({ version: "v1b3", auth: auth });

  const date = new Date().toISOString().slice(0,10);

  dataflow.projects.locations.flexTemplates.launch({
    projectId: process.env.project,
    location: process.env.region,
      resource: {
        launchParameter: {
          containerSpecGcsPath: `gs://${process.env.bucket}/dataflow_templates/rank_stream_to_bigquery.json`,
          jobName: `rank-stream-to-bigquery-${date}`,
          parameters: {
            api_key: process.env.api_key,
            date: date,
            campaign: process.env.campaign,
            se: process.env.se,
            domain: process.env.domain,
            project: process.env.project,
            dataset: process.env.dataset,
            table_name: process.env.table_name,
            bucket: process.env.bucket,
            runner: process.env.runner,
            experiments: "disable_flex_template_entrypoint_overrride",
            staging_location: `gs://${process.env.bucket}/staging`,
            temp_location: `gs://${process.env.bucket}/temp`,
            service_account_email: process.env.service_account_email
          }
        }
      }
    },
    function (err, response) {
      if (err) {
        console.error("Problem running dataflow template, error was: ", err);
      } console.log("Dataflow template response: ", response);
    });
};
If you’re having trouble running the Dataflow job via the google-apis method, I would recommend using the API Reference to run some test jobs, to see where you might be being tripped up:
It took me a fair amount of tactical Googling (i.e. searching for “containerSpecGcsPath”) to find the documentation explaining how this method is supposed to work. As, wouldn’t you know it, the REST API method to run the Flex Templates are completely different to the regular Custom Templates (which all the examples seem to use). However, the API Explorer on that page does a good job of equipping you with all the code you’ll need to use to run it yourself in your own environment.
So once that’s done, hit “Deploy” and we’re almost there!
Run the Dataflow Pipeline
Now that we’ve got all the required steps are in place, the only thing left is to make sure that it works.
If you head back to the Cloud Scheduler, and hit “Run Now” and wait a few seconds (or go to the Cloud Functions logs to watch it running in real time) before heading to the Dataflow section to see that the job has started. It’ll usually take a few minutes, assuming you’re not using a bunch of workers; mine was typically taking in the region of ~14 minutes before it began running with one assigned worker.
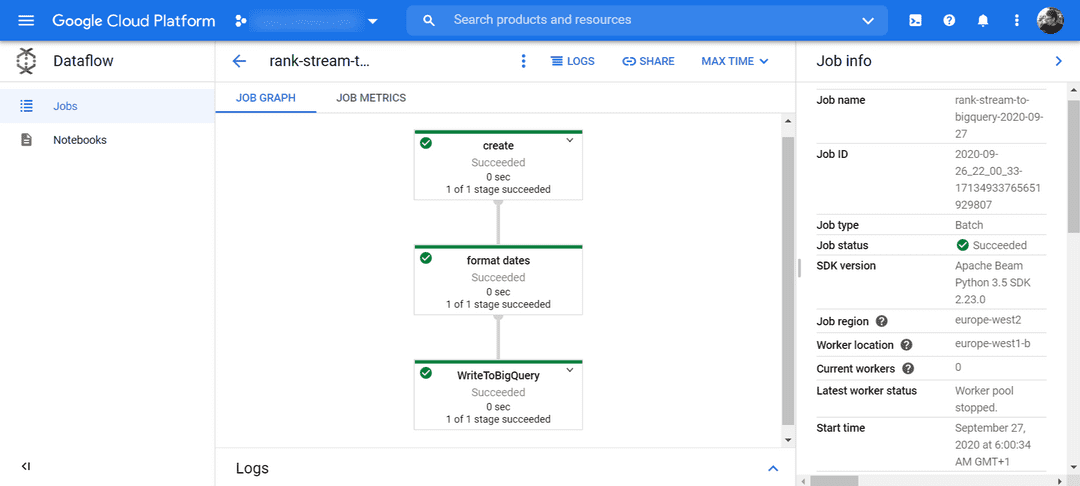
And then once your Dataflow job is run you can check out the acyclic graph that’s been built from your Beam pipeline, and if it’s run successfully everything will be in green and your data will now be residing safely in BigQuery.
Mmm, look at all that green.
Final thoughts
And that’s it, data should be landing in your warehouse any moment now. Step back and bask in the warm glow of having successfully set up a fully functioning, serverless ETL pipeline; taking in data from an API, running some transforms on it in the middle, and then writing it to your BigQuery table of choice. And best of all, it’s all completely self-managed through Google Cloud Platform.
Now there’s nothing left for you to do but kick back, relax and query your data with ease. 🍹
